Why colour-change technique matters
If you change colour in the middle of a stitch (or in the wrong place), there's a visible 'bump' or a colour smudge where the two yarns meet. Done well, colour changes are almost invisible — the fabric looks like the colours are clean-edged from row to row.
Good colour-change technique also affects the back of your work. Sloppy changes leave loose loops, knots and long ends that fray. Neat changes produce a tidy back where the transitions are barely visible.
This tutorial covers the standard 'invisible join' method — the technique used in almost every modern crochet pattern. If you've ever wondered how granny squares get those clean colour-change lines, this is it.
When to change colour in a crochet stitch
The critical insight: don't change colour at the start of the new colour's first stitch — change at the END of the old colour's last stitch.
Specifically, on the LAST stitch in the old colour, pause when you have 2 loops left on the hook. These 2 loops are the final 'close' of that stitch. Do the final yarn-over with the NEW colour instead of the old one.
The reason: the top of every crochet stitch is technically part of the NEXT stitch built on it. So when you finish a stitch with the new colour, the 'top' of that stitch (which becomes the base of the next row's stitch) is already the new colour. Your next row starts visually in the new colour from the very first stitch.
This applies to every stitch type — single crochet, half-double, double and treble. The rule is always: switch colours on the final yarn-over of the last stitch in the old colour.
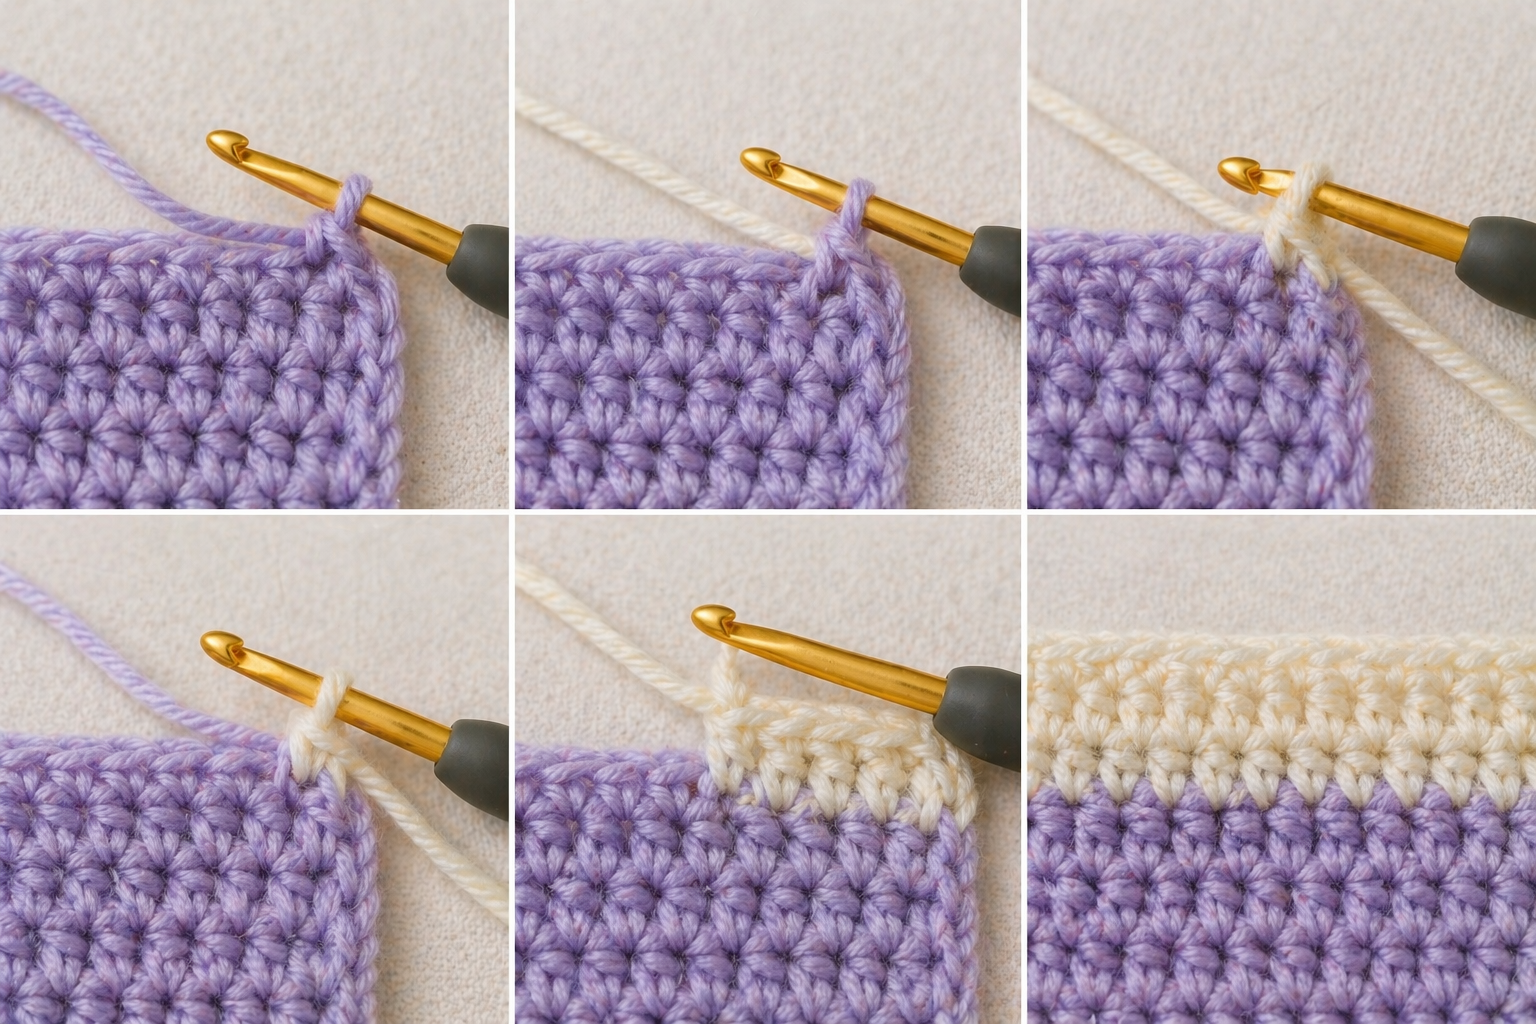
How to change colour — step by step
This walks through changing colour at the end of a row in double crochet. The technique is identical for other stitches — just pause when 2 loops remain on the hook.
Step 1. Work your last double crochet in the old colour as normal until you have 2 loops on your hook (after the 'pull through 2' middle step of dc). STOP here.
Step 2. Pick up the new colour yarn. Leave a 15 cm tail of the new yarn hanging free — you'll weave this in later.
Step 3. Yarn over with the NEW colour (not the old one).
Step 4. Pull the new colour through the 2 loops on your hook. Your double crochet is now 'finished' — but it's finished with a loop of the new colour on top.
Step 5. Chain 3 (or your pattern's turning chain) using the new colour.
Step 6. Turn your work. Work the rest of the next row in the new colour as normal.
Step 7. The old colour now has a short tail hanging at the colour-change point. Leave it for now — you'll weave it in at the end of the project (or carry it up the side if you'll use it again soon).
Step 8. For stripes that alternate colours every 1–2 rows: don't cut the old yarn. Let it hang, change colour using the technique above, and on the next colour change just pick the old yarn back up. This 'carrying' the yarn up the side avoids weaving in ends for every stripe.
Common colour-change mistakes (and quick fixes)
Changing colour at the start of a row, not the end of the previous. Produces a visible colour 'smudge' where the old stitch finishes with a partial wrong-colour loop. Fix: always change on the final pull-through of the last stitch in the old colour.
Knotting the old and new yarn together. Looks messy on the back and creates a hard bump. Never knot; just hold the new yarn in place while you pull the first loop through.
Tails coming undone. Too-short tails don't stay woven in. Always leave at least 15 cm per colour change. 20 cm is safer.
Cutting yarn between every colour. Fine for stripes where colours swap once or twice — wasteful for stripes alternating every 2 rows. Carry unused yarn up the side of the work instead of cutting and rejoining.
Colours showing through a different colour's stitch. Happens with contrasting colours where the yarn ends aren't hidden properly. Fix: weave in ends through stitches of the SAME colour where possible. Weaving a dark end through light-coloured stitches makes the end visible from the outside.
Handling yarn ends — weaving in vs carrying
For projects with only 2–3 colour changes: cut the yarn between colours, leave a 15 cm tail, and weave in all ends with a tapestry needle when the project is finished.
For stripes alternating every 1–2 rows: don't cut. Let the unused colour hang at the side of the work, then pick it back up on the next colour change. This 'carrying' creates vertical strands on the side that you can crochet over or hide with a simple single-crochet border.
For stripes alternating every 3+ rows: judgement call. Cutting is tidier but creates many ends. Carrying creates longer floats on the side that are harder to hide.
For colourwork (tapestry crochet, intarsia): more complex rules apply — yarn is usually carried behind the fabric or crocheted over, not down the side. This is an intermediate technique beyond the basics of stripes.
How to weave in ends properly
Thread a tapestry needle with the yarn tail. A blunt tapestry needle (John James size 18 or 20) won't split the yarn. Sharp needles split strands and create weak spots.
Weave the tail THROUGH stitches of the same colour for at least 5–7 cm. Go through the back of individual stitches, not through gaps between stitches. If you weave through gaps, the tail can slip out.
Change direction halfway through weaving. Weave 3 cm in one direction, then loop back and weave 3 cm in a different direction. This locks the end in place so it won't pull out when the project is washed.
Cut the tail close to the fabric — about 3 mm from where the weave ends. Pull the fabric slightly to let the end retract into the stitches.
Test: after weaving in, gently tug the tail. It shouldn't pull out. If it does, weave it again with more direction changes.
Colour-change ideas for beginner projects
Stripe blanket. Alternate two colours every 4–6 rows in a double crochet blanket. Our how to crochet a blanket guide covers blanket sizing and yarn requirements. Stripes are the easiest way to add visual interest without learning new stitches.
Colour-block scarf. Three sections of different colours in a plain double crochet scarf. One colour change at each section boundary. See how to crochet a scarf for sizing.
Multicoloured granny squares. Change colour every round for the classic 'stained glass' look. Four colour changes per square, so budget extra time for weaving in ends.
Two-colour beanie. Solid colour for the crown and body, contrasting colour for the ribbed brim. A single colour change creates a professional-looking finished piece.